Updated on 2020-05-10: More “fun” with TimeMachine is here.
Say, you have an external USB drive for TimeMachine backups on OSX. (You make backups, don’t you?) Now you want to replace it with a larger drive, so the task is to copy all the data to the new disk. There are two ways to do it:
Create an equivalent partition setup on the new disk and copy all the files on each filesystem. Since the default TimeMachine setup is to have one (visible) user’s partition, it shouldn’t be too hard, however you want to make sure all the information is copied, including file timestamps, Access Control Lists, extended attributes, etc. The best tool I know for this job is rsync (install a newer version from brew), however I had issues in the past when copying Time Machine backups because those directories have some special permissions and even sudo didn’t help.
Clone the disk byte-by-byte. This is a lower-level approach, which doesn’t care about which partitions and filesystems you have and you will have an exact copy. It will copy all the disk’s bytes, even if you’re really using little space. Since we’re migrating to a larger disk, all the old bytes will fit.
The latter approach seems to me a better one for the exact duplication of a TimeMachine backup drive. How I did it and a few necessary steps follow.
Cloning
Of course, we’ll use the classic UNIX tool dd for disk cloning. The already present in OSX version is old, so it’s better to brew install coreutils to get a new version that natively displays the progress.
Connect both disks and identify the devices in /dev with:
1234567891011121314151617181920212223242526
$ diskutil list
/dev/disk0 (internal, physical):
…
/dev/disk1 (synthesized):
…
/dev/disk2 (external, physical):
#: TYPE NAME SIZE IDENTIFIER0: GUID_partition_scheme *1.0 TB disk2
1: EFI EFI 209.7 MB disk2s1
2: Apple_CoreStorage fooo 999.9 GB disk2s2
3: Apple_Boot Boot OS X 134.2 MB disk2s3
/dev/disk3 (external, virtual):
#: TYPE NAME SIZE IDENTIFIER0: Apple_HFS fooo +999.5 GB disk3
Logical Volume on disk2s2
0B1F4DE5-EFF1-4BEA-889F-2D547F528ECD
Unlocked Encrypted
/dev/disk5 (external, physical):
#: TYPE NAME SIZE IDENTIFIER0: GUID_partition_scheme *3.0 TB disk5
1: EFI EFI 209.7 MB disk5s1
2: Apple_HFS Untitled 3.0 TB disk5s2
Disks 0 and 1 are internals, don’t touch those. Disk 2 is my old 1 TB backup drive, with an encrypted HFS+ partition labeled fooo, so /dev/disk2 is the source. Disk 5 is the new 3 TB drive with one empty HFS+ partition, so /dev/disk5 is the destination. Nota Bene: I will use my example identifiers below, and you must use yours; be very careful when typing them, or e.g. you may corrupt the internal disk.
Unmount all partitions of both disks:
1234
$ diskutil unmountDisk /dev/disk2
Unmount of all volumes on disk2 was successful
$ diskutil unmountDisk /dev/disk5
Unmount of all volumes on disk5 was successful
$ time caffeinate sudo gdd if=/dev/rdisk2 of=/dev/rdisk5 bs=1M status=progress conv=noerror,sync
time will print the whole execution time. caffeinate is a standard OSX command to prevent computer sleep while the command is executing. sudo is necessary to have access to the raw disks. gdd is the newer dd from the coreutils package. if and of are the source and destination disks respectively; also note that the files are /dev/rdiskX with the extra r — this bypasses some system caches and make the process faster. bs specifies the block size of 1 MB, other values may be faster for your setup.
This will take some time depending on the disk size. Approximately 11906 seconds later it was done (the peak speed was about 111 MB/s near the beginning):
1234
953869+1 records in953870+0 records out
1000205189120 bytes (1.0 TB, 932 GiB) copied, 11906.1 s, 84.0 MB/s
caffeinate sudo gdd if=/dev/rdisk2 of=/dev/rdisk5 bs=1M status=progress conv=107.16s user 305.73s system 3% cpu 3:18:40.55 total
Now I disconnected both disks and reconnected the new one; note /dev/disk2 is the new disk now:
1234567891011121314
$ diskutil list
/dev/disk2 (external, physical):
#: TYPE NAME SIZE IDENTIFIER0: GUID_partition_scheme *3.0 TB disk2
1: EFI EFI 209.7 MB disk2s1
2: Apple_CoreStorage fooo 999.9 GB disk2s2
3: Apple_Boot Boot OS X 134.2 MB disk2s3
/dev/disk3 (external, virtual):
#: TYPE NAME SIZE IDENTIFIER0: Apple_HFS fooo +999.5 GB disk3
Logical Volume on disk2s2
0B1F4DE5-EFF1-4BEA-889F-2D547F528ECD
Unlocked Encrypted
It mounts just fine.
Recovering extra space
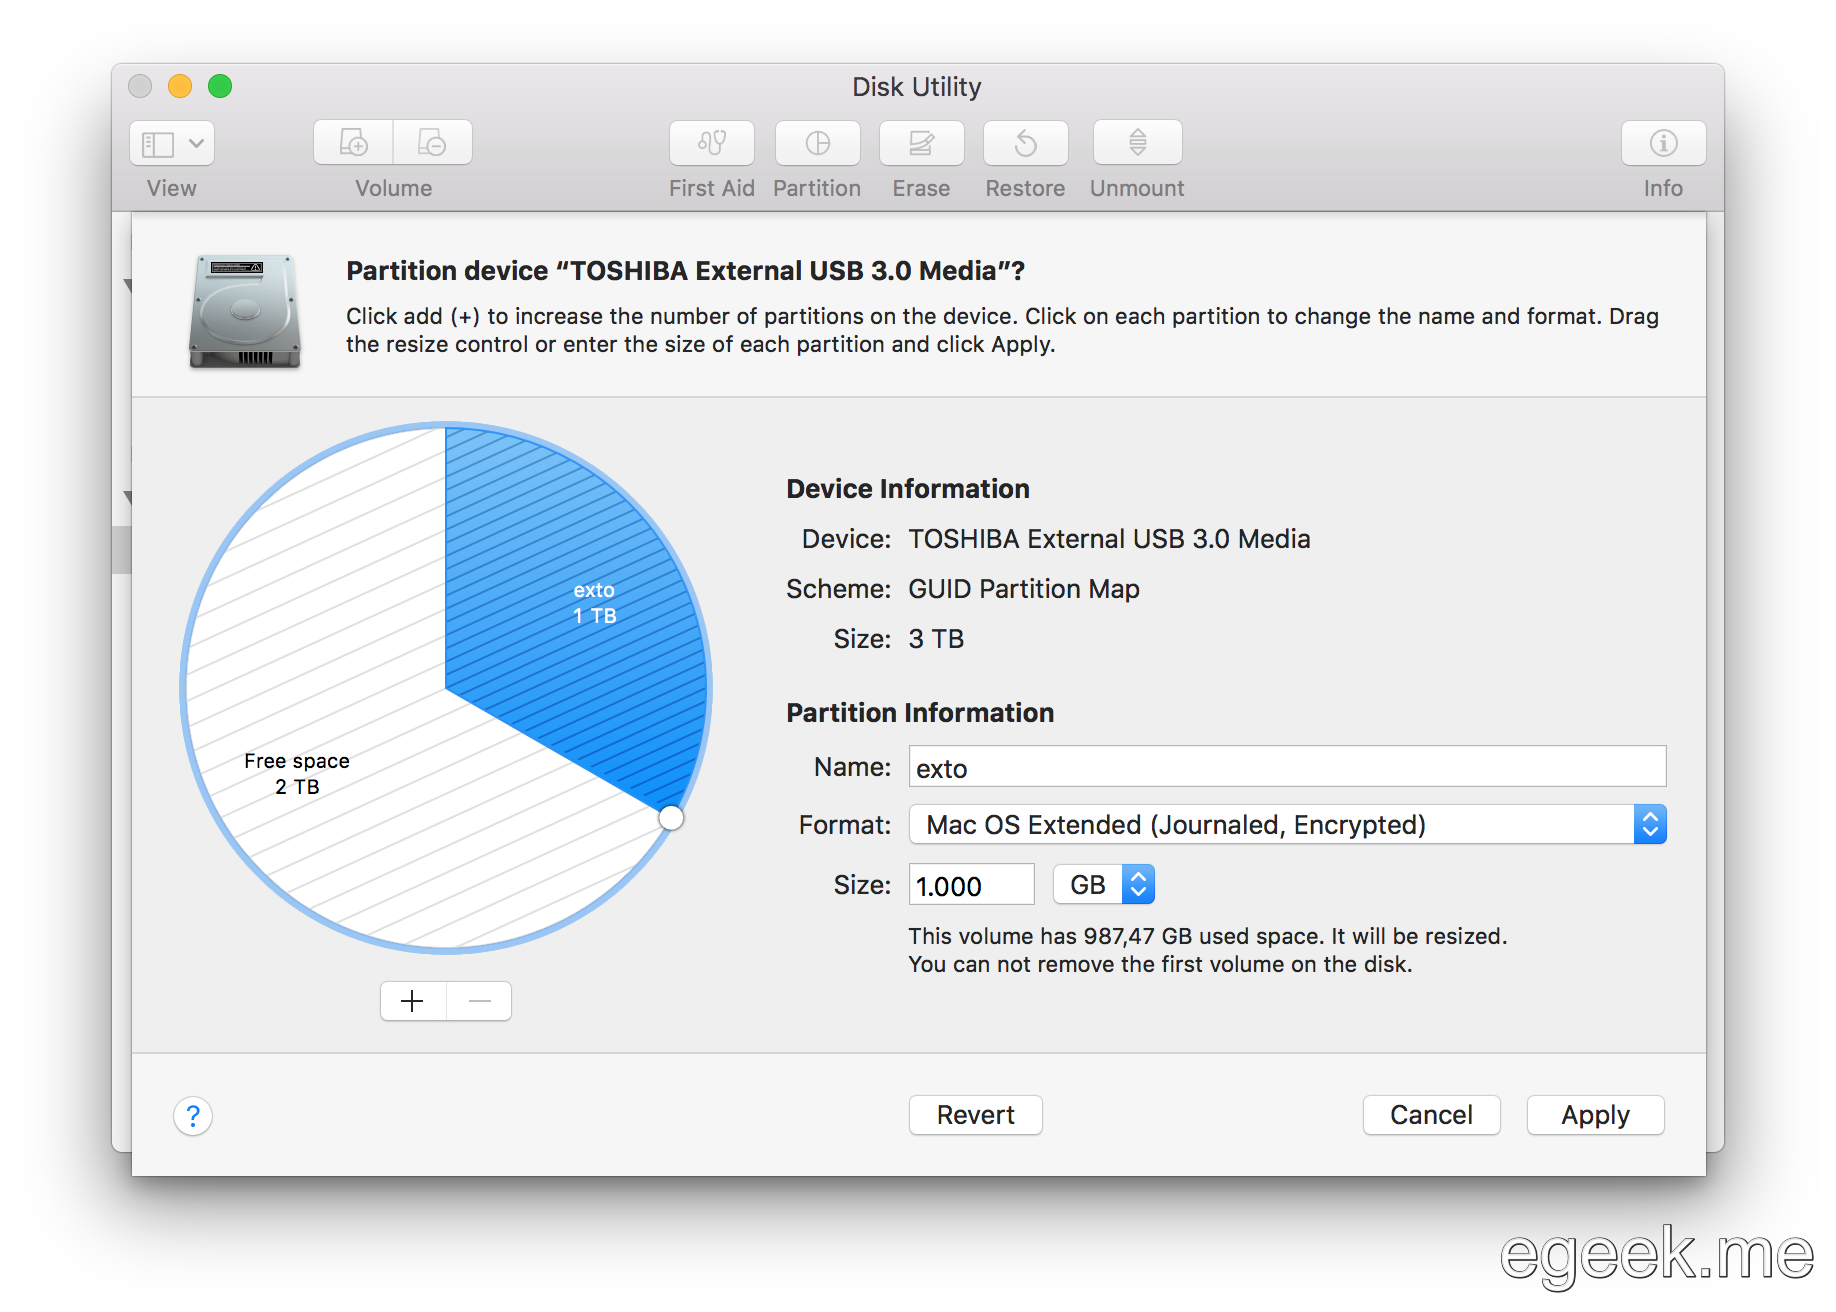
As seen in the previous listing, the disk has 3 TB, whereas the partition #2 is still 1 TB. Copying the disk block-by-block duplicated the partition structure as-is, meaning they have exactly the same sizes as before. The newer disk is larger, so we want to resize the user’s partition to the maximum.
At first, I went to the standard Disk Utility and attempted to resize the partition, but it would be too easy if it worked. It displayed the free space, but I couldn’t drag the sector to increase the size of my partition:
Adding new partitions didn’t use the “Free space 2 TB” area either. There is nothing else to do in Disk Utility.
123456
$ diskutil resizeVolume /dev/disk2s2 limits
Resize limits for partition disk2s2:
  Current partition size on map:             999.9 GB (999860912128 Bytes)
  Minimum (constrained by file usage):       987.5 GB (987482935296 Bytes)
  Recommended minimum (if used for macOS):   998.2 GB (998220353536 Bytes)
  Maximum (constrained by map space):        3.0 TB (3000247977984 Bytes)
The problem here is that the GPT header contains the pointer to the backup GPT, which should be located at the end of the drive. That’s why nothing can use the extra space at this point; therefore we need to either recreate or update the GPT.
Rebuilding GPT (dead end)
Searching for answers online, I bumped into two Stack Exchange questions: Resizing HFS+ volume after cloning and Resizing or expanding a CoreStorage volume, where answers show how to rebuild the GPT. From them I discovered the gpt tool. If you’re careful, there isn’t much harm in rebuilding the partition table as the answer suggests — this doesn’t touch the partitions themselves, so if you restore the metadata correctly, it all should work.
1234567891011121314151617
$ sudo gpt -r -vv show /dev/disk2
Password:
gpt show: /dev/disk2: mediasize=3000592979968;sectorsize=512;blocks=5860533164gpt show: /dev/disk2: PMBR at sector 0gpt show: /dev/disk2: Pri GPT at sector 1gpt show: /dev/disk2: Sec GPT at sector 5860533163 start size index contents
01 PMBR
11 Pri GPT header
232 Pri GPT table
346404096001 GPT part - C12A7328-F81F-11D2-BA4B-00A0C93EC93B
40964019528533442 GPT part - 53746F72-6167-11AA-AA11-00306543ECAC
19532629842621443 GPT part - 426F6F74-0000-11AA-AA11-00306543ECAC
19535251283907008003586053313132 Sec GPT table
58605331631 Sec GPT header
I played with that, but it didn’t help. If I remember correctly, the partition GUIDs changed and CoreStorage logical volume wouldn’t mount. I won’t replicate and describe those steps here. At least, it was easy to restore the original GPT from the old disk using gdd.
FYI OSX is very annoyingly persistent at remounting the volumes after any touch, so I needed to diskutil unmountDisk /dev/disk2 very often!
The fix is to use the gdisk command to move the backup GPT to the end of the disk and update the primary GPT to match that. Essentially, the commands are x for expert mode, e to move the GPT, and w to update data on disk. Here’s the listing with the output:
$ sudo gdisk /dev/disk2
GPT fdisk (gdisk) version 1.0.4
Partition table scan:
MBR: protective
BSD: not present
APM: not present
GPT: present
Found valid GPT with protective MBR; using GPT.
Command (? forhelp): p
Disk /dev/disk2: 5860533164 sectors, 2.7 TiB
Sector size (logical): 512 bytes
Disk identifier (GUID): D3687ABD-57DD-4C38-8972-C8A67BB3B2E8
Partition table holds up to 128 entries
Main partition table begins at sector 2 and ends at sector 33First usable sector is 34, last usable sector is 1953525134Partitions will be aligned on 8-sector boundaries
Total free space is 13 sectors (6.5 KiB)Number Start (sector) End (sector) Size Code Name
140409639200.0 MiB EF00 EFI System Partition
24096401953262983931.2 GiB AF05 ext
319532629841953525127128.0 MiB AB00 Booter
Command (? forhelp): x
Expert command(? forhelp): e
Relocating backup data structures to the end of the disk
Expert command(? forhelp): p
Disk /dev/disk2: 5860533164 sectors, 2.7 TiB
Sector size (logical): 512 bytes
Disk identifier (GUID): D3687ABD-57DD-4C38-8972-C8A67BB3B2E8
Partition table holds up to 128 entries
Main partition table begins at sector 2 and ends at sector 33First usable sector is 34, last usable sector is 5860533130Partitions will be aligned on 8-sector boundaries
Total free space is 3907008009 sectors (1.8 TiB)Number Start (sector) End (sector) Size Code Name
140409639200.0 MiB EF00 EFI System Partition
24096401953262983931.2 GiB AF05 ext
319532629841953525127128.0 MiB AB00 Booter
Expert command(? forhelp): w
Final checks complete. About to write GPT data. THIS WILL OVERWRITE EXISTING
PARTITIONS!!
Do you want to proceed? (Y/N): Y
OK; writing new GUID partition table (GPT) to /dev/disk2.
Warning: Devices opened with shared lock will not have their
partition table automatically reloaded!
Warning: The kernel may continue to use old or deleted partitions.
You should reboot or remove the drive.
The operation has completed successfully.
Be careful when doing a block-for-block copy of a GPT disk. The GUID in the partition table header that identifies the disk (and the GUIDs in each partition entry) are meant to be globally unique, and Apple’s system software relies on this feature. If you block copy a disk, you should consider whether it’s appropriate to set these GUIDs to new values. … If you don’t follow this advice, you may encounter weird problems. For example, if you duplicate a disk without updating the GUIDs, the computer might boot from either the original or the copy in an unpredictable fashion (perhaps toggling from boot to boot).
And indeed, when the new backup drive is mounted and I connect the old one with the same GUIDs, it fails to mount:
123456789101112131415161718192021222324
$ diskutil mount /dev/disk5s2
Volume on disk5s2 failed to mount
$ diskutil list
/dev/disk2 (external, physical):
#: TYPE NAME SIZE IDENTIFIER0: GUID_partition_scheme *1.0 TB disk2
1: EFI EFI 209.7 MB disk2s1
2: Apple_CoreStorage fooo 999.9 GB disk2s2
3: Apple_Boot Boot OS X 134.2 MB disk2s3
/dev/disk3 (external, virtual):
#: TYPE NAME SIZE IDENTIFIER0: Apple_HFS fooo +999.5 GB disk3
Logical Volume on disk2s2
0B1F4DE5-EFF1-4BEA-889F-2D547F528ECD
Unlocked Encrypted
/dev/disk5 (external, physical):
#: TYPE NAME SIZE IDENTIFIER0: GUID_partition_scheme *3.0 TB disk5
1: EFI EFI 209.7 MB disk5s1
2: Apple_CoreStorage 3.0 TB disk5s2
3: Apple_Boot Boot OS X 134.2 MB disk5s3
diskutil is confused — there is no label for /dev/disk5s2.
I haven’t found a way to change the UUID of an existing CoreStorage Logical Volume and Volume Group. I could’ve manually edited the GUIDs in the GPT, but that would not touch the CoreStorage virtual volumes. So instead I recreated the whole thing from scratch (connecting only the old drive, which is /dev/disk2 now):